
Debugging C# Source Generators with Visual Studio 2019 16.10


Background
I'm a big fan of source generators that were added in C#9, but debugging has been a bit of a pain so far, involving forcing breakpoints in code and attaching the debugger during compilation.
With the RTM release of 16.10 Visual Studio 2019, things now get a bit easier with the introduction the new IsRoslynComponent element in the csproj file and a new debugger launch option of Roslyn Component.
At time of writing, this has not had much publicity, other than a short paragraph in the release notes and a short demo in an episode of Visual Studio Toolbox.
Therefore, to give some visibility to this new functionality, I have written this short step-by-step guide.
If you are new to source generators, there are lots of great resources out there, but a good starting point is this video from the ON.NET show
Before Starting
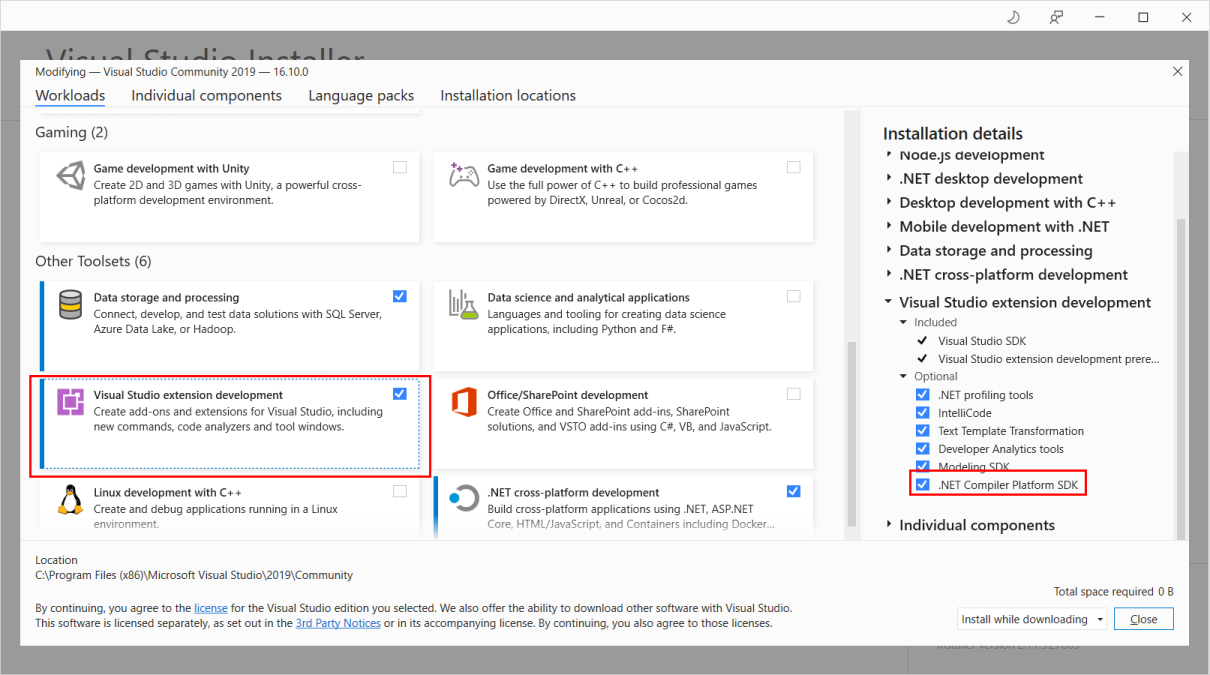
In order to take advantage of the new debugging features in VS2019, you will need to make sure that you have the .NET Compiler Platform SDK component installed as part of Visual Studio.
This is shown as one of the components installed with the Visual Studio extension development workload.
Step By Step Guide
For this guide, I am assuming that you already have a source generator that you have written, but if not, I have put the source code for this guide on GitHub if you want to download a working example.
Step 1 - Add the IsRoslynComponent Property to Your Source Generator Project
The first step in making use of the new debugging functionality is to add a new entry to your project.
The property to add is IsRoslynComponent and the value should be set to true
You will need to do this in the text editor as there is no user interface to add this.

Whist in the project file, make sure that you have the latest versions of the core NuGet packages that you require / are useful to work with source generators.
The screen shot below shows the versions that are active at time of writing this post

Step 2 - Add a Reference to Your Source Generator Project to a Consuming Project
For the purpose of this guide, I am using a project reference to consume the source generator.
When referencing a source generator, there are two additional attributes that need to be set to flag that this is an analyser that does not need to be distributed with the final assembly. These are
- OutputItemType = "Analyzer"
- ReferenceOutputAssembly="false"

Step 3 - Build All Projects and View Source Code
To keep this guide short, I am assuming that both the source generator project and the consuming project have no errors and will build.
Assuming that this is the case, there are two new features in VS2019 for source generators that are useful for viewing the generated code.
The first is in the Dependencies node of the consuming project where you will now find an entry in the Analyzers node of the tree for your source generator project. Under this, you can now see the generated files (Item 1 in the screen shot below)
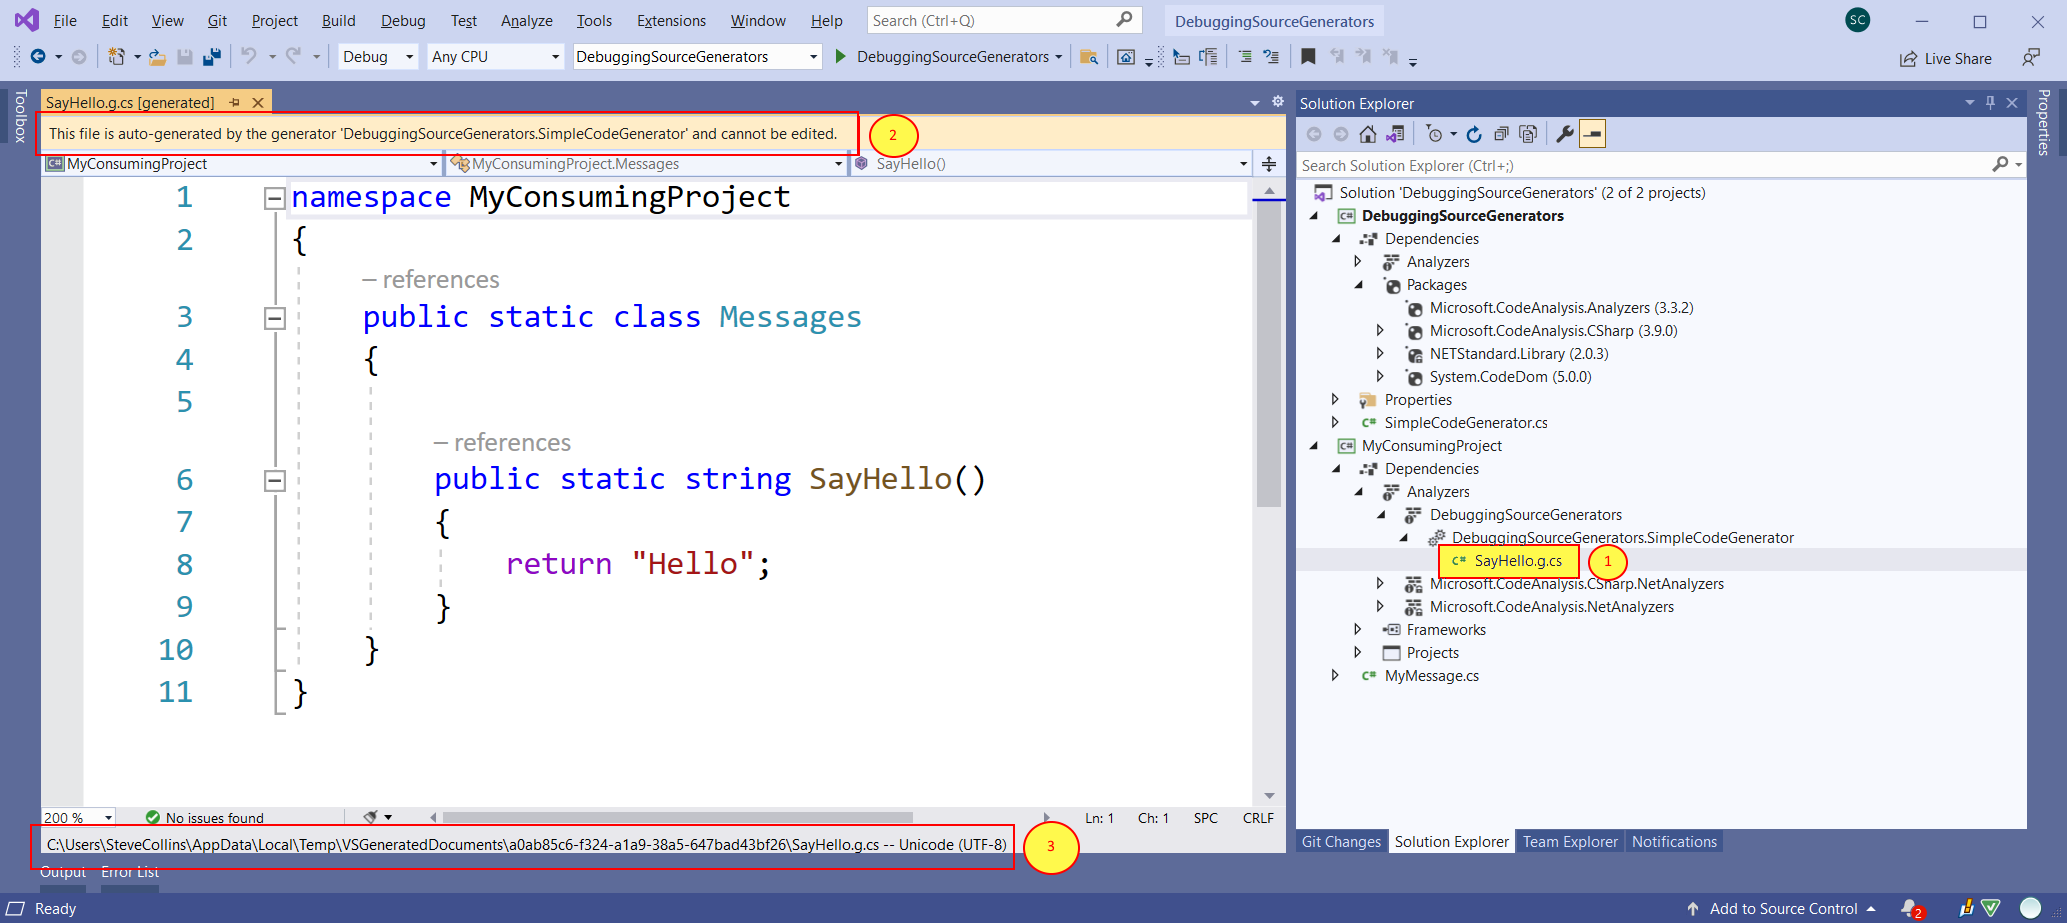
There are two other things to notice in this screen shot.
Item 2 is the warning that this is a code generated file and cannot be edited (the code editor will not allow you to type into the window even if you try).
Item 3 highlights the editor showing where the file is located. Note that by default, this is in your local temp directory as specified by the environmental variable.
Now that the source code can be viewed in the code window, you can set a breakpoint in the generated code as you would with your own code.
The second new feature is that the code window treats the file as a regular code file, so you can do things like 'Find All References' from within the generated file. Conversely, you can use 'Goto Definition' from any usages of the generated members to get to the source generated file in the editor.
Step 4 - Prepare to Debug The Source Generator
This is where the 'magic' in VS2019 now kicks in!
First, in Solution Explorer, navigate to the source generator project and navigate to the properties dialog, then into the Debug tab.
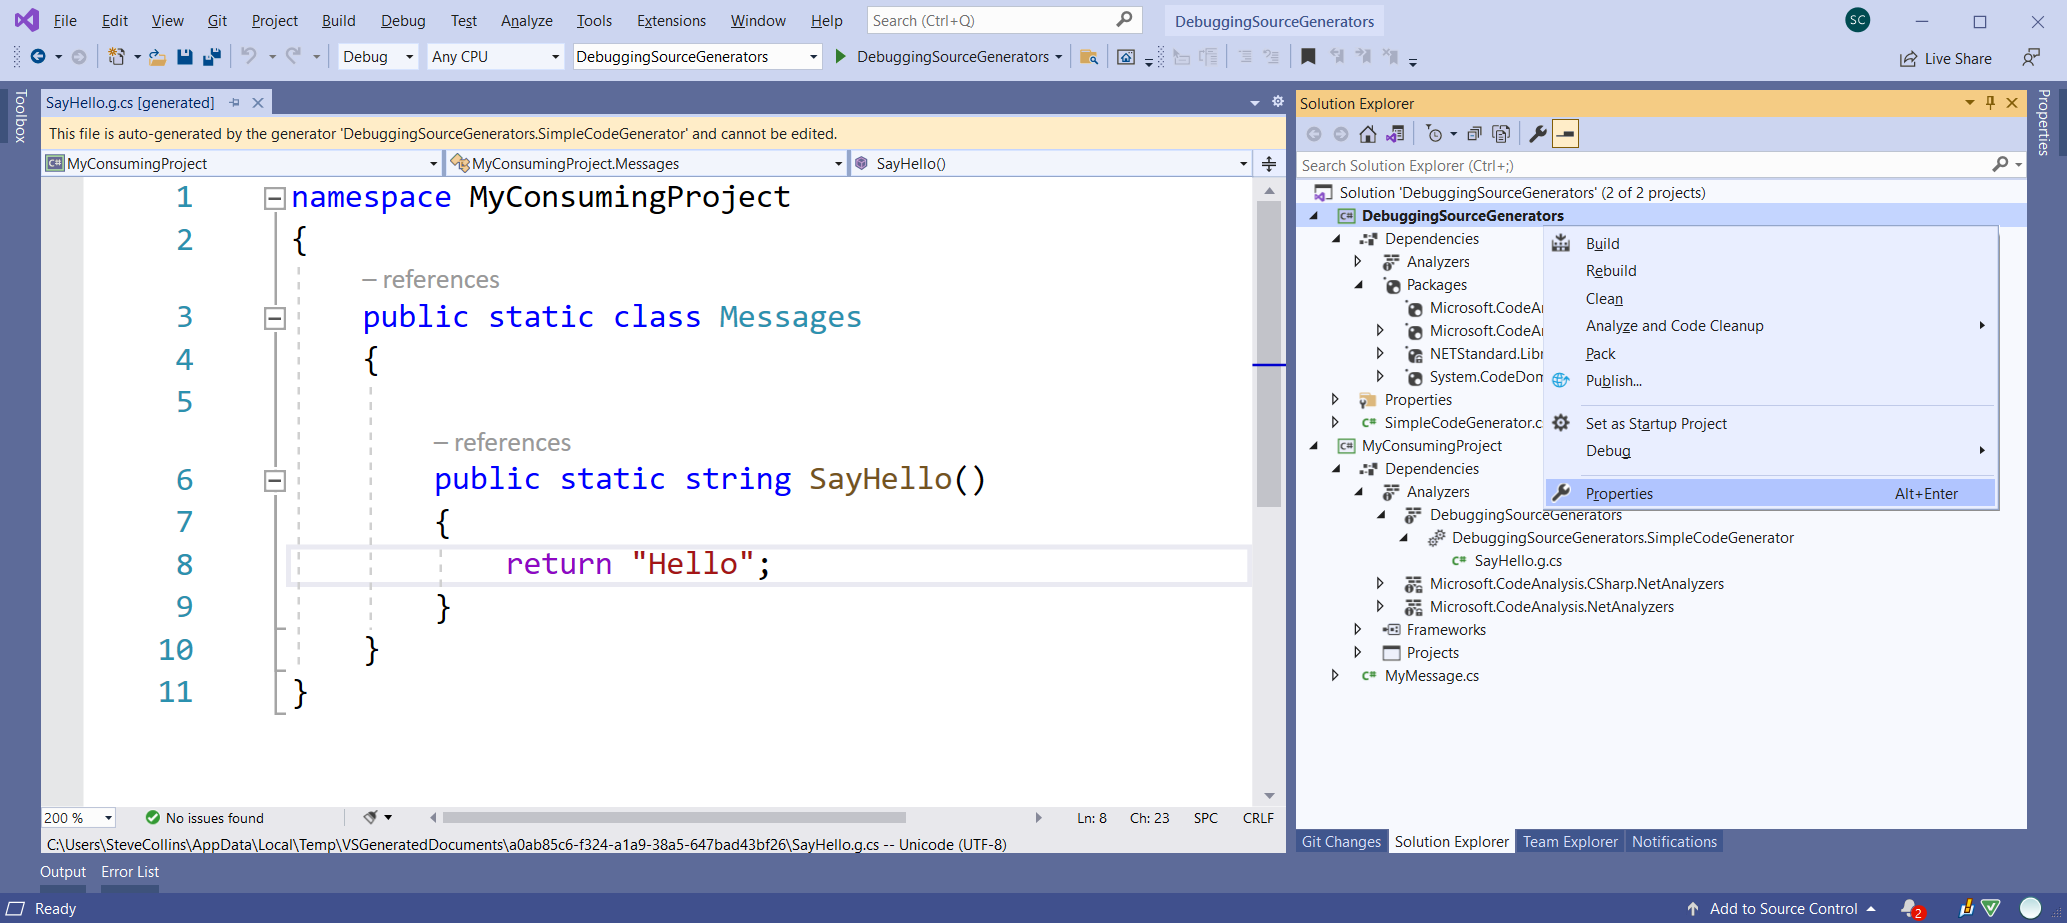
At this point, when you open the Launch drop down, you will notice at the top there is now a Roslyn Component option which has now been enabled thanks to the IsRoslynComponent entry in your project file.
Having clicked on this, you can set which project you want to use to trigger the source generator (in our case, the consuming project) in the drop down in the panel. Then set use the context menu on the the source generator project to set it to be the start up project to use when you hit F5 to start debugging.

Step 5 - Start Debugging
In your source generator project, find an appropriate line to place a breakpoint in your code, inside either the Inititialize or Execute methods of your generator class.
You are now ready to hit F5 to start debugging!
What you will notice is that a console window pops up with the C# compiler being started. This is because you are now debugging within stage of the compiler that is using your code to generate the source code to be used elsewhere in the build.
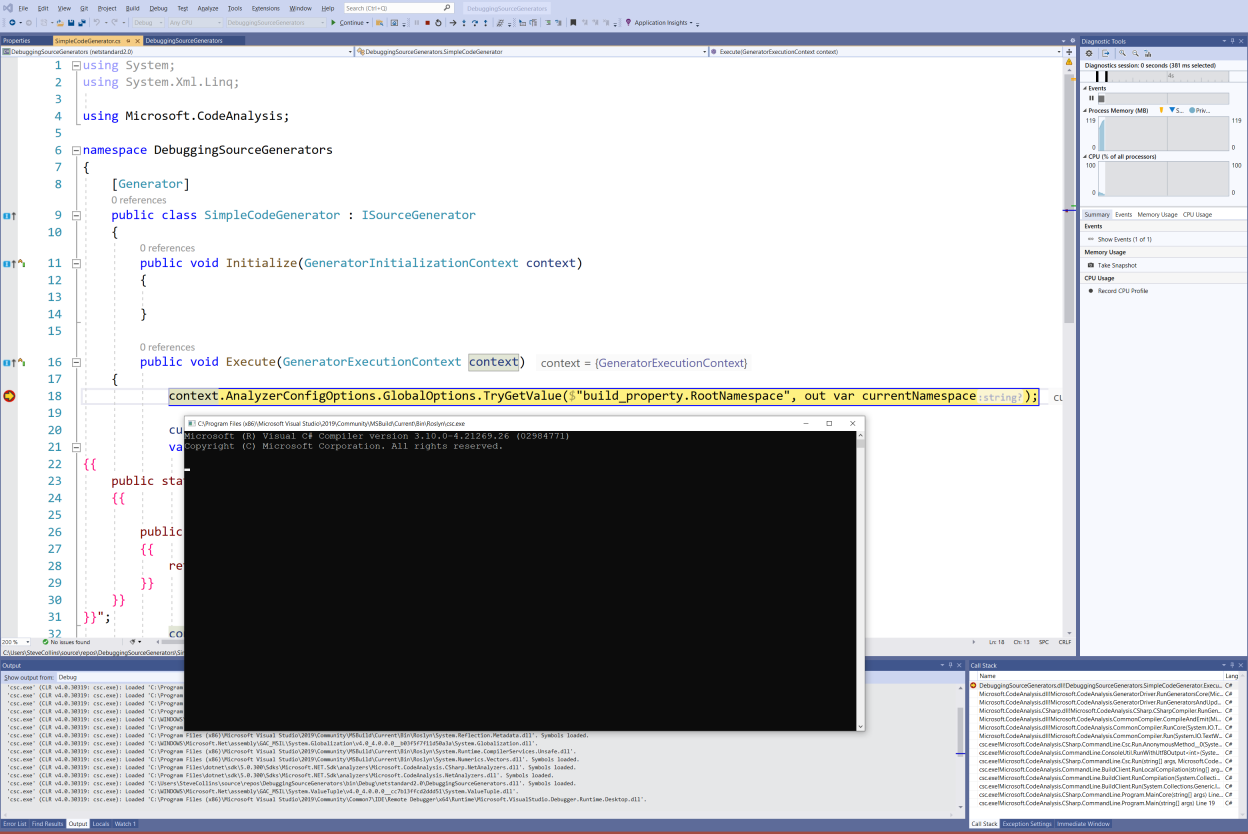
Now, you can step through your source generator code as you would with any other code in the IDE.
Step 6 - Changing Code Requires a Restart of Visual Studio
If as part of the debugging process you find you need to change your code. When you recompile and start debugging again, you may find that your changes have not taken effect from within your Visual Studio session.
This is due to the way that Visual Studio caches analyzers and source code generators. In the 16.10 release, the flushing of the cache has not yet been fully addressed and therefore, you will still need to restart Visual Studio to see your code changes within the generator take effect.
If you find that you need to make changes iteratively to debug a problem, you may want to go back to including conditional statements in your code to launch the debugger and use the dotnet build command line to get the compiler to trigger the source code generation in order to debug the problem.
If you do need to do this, I take the following approach to avoid debugger code slipping into the release build.
(1) In the Configuration Manager, create a new build configuration based on the Debug configuration called DebugGenerator
(2) In the project's build properties, create a conditional compilation symbol called DEBUGGENERATOR
(3) In the Initialize method of the source generator to be debugged, add the following code
(4) Instead of using Visual Studio to trigger a build, open a command line instance and use the following to start the build
dotnet build -c DebugGenerator --no-incremental
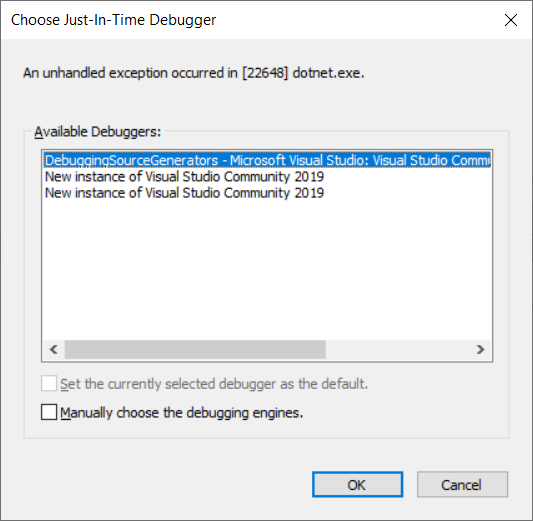
This will force the build to use the configuration that will trigger the debugger to launch. Usually when the compiler reaches the line to launch the debugger, you will be prompted to select an instance of Visual Studio. At this point, select the instance that you have just been editing.
After a short period of loading symbols, Visual Studio will break on the Debugger.Launch line. You can now set a breakpoint anywhere in your source generator project (if not already set) and use F5 to run to that line.
Note, I have used the --no-incremental switch to force a rebuild so that the debugger launch is triggered even if the code has not changed.
A Gotcha!
When I started playing with this new functionality, I loaded up an existing source generator that had been written by a colleague and found that the option to select Roslyn Component was not available, but worked when I created a new source generator project
After a few hours of trial and error by editing the project file, I found that the existing source generator had a reference to the Microsoft.Net.Compilers.Toolset NuGet package. Taking this out and restarting Visual Studio triggered the new functionality of VS to kick in.
If you look at the description of the package, it becomes clear where the problem arises. In short, it comes with its own set of compilers instead of using the default compiler. The current 'live' version is 3.9.0 which does not appear to support the IsRoslynComponent element. The version required to work is still in pre-release - 3.10.0-3.final.
If you hit this snag, it is worth investigating why the package has been used and whether it can be removed given that
- It is not intended for general consumption
- It is only intended as a short-term fix when the out-of-the-box compiler is crashing and awaiting a fix from Microsoft
More details on why it should not be used can be found in this Stack Overflow answer from Jared Parsons.
Conclusion
Whilst not perfect due to the caching problem, the 16.10 release of Visual Studio has added some rich new functionality to help with writing and debugging source generators.